Introduction
In today’s data-driven world, organizations are collecting, analyzing, and sharing vast amounts of information. While this data can provide valuable insights for businesses, it also needs to be protected and secured appropriately. This is especially true for sensitive data, such as financial records, customer information, or intellectual property. As one of the leading business intelligence and data visualization platforms, Microsoft Power BI offers a wide range of features to help organizations secure their data. One of the key aspects of data security in Power BI is its role-based security model. This model allows organizations to control access to data, reports, and dashboards based on user roles and permissions. In this article, we’ll explore Power BI’s role-based security features in depth, providing a comprehensive guide for organizations looking to secure their data while leveraging the power of business intelligence. We’ll cover the different levels of security, the process of implementing role-based security, and best practices to ensure data privacy and compliance. By the end, organizations should feel empowered to utilize Power BI’s security features effectively and confidently.
Understanding Role-Based Security in Power BI
Role-based security is a fundamental concept in Power BI that allows organizations to control access and permissions for different users. It is based on the principle of assigning specific roles to users or groups, with each role having predefined permissions outlining what actions they can perform and what data they can access. The primary goal of role-based security is to provide granular control over sensitive data, ensuring that only authorized individuals can view, modify, or share information. This is crucial for maintaining data privacy and preventing unauthorized access or data breaches. Power BI offers three main levels of role-based security:
- Workspace Roles: These roles control access to the workspace, which is the primary container for content creation and collaboration in Power BI. Workspace roles determine who can edit, publish, or interact with the data and visualizations within a specific workspace. Common roles include Workspace Admin, Member, and Viewer, each with distinct permissions.
- Dataset Roles: Dataset roles govern access to specific datasets within a workspace. These roles are crucial for controlling which users can view or interact with particular data sources. Organizations can create custom dataset roles with specific permissions, such as allowing users to only read data or granting them additional privileges to edit or refresh the dataset.
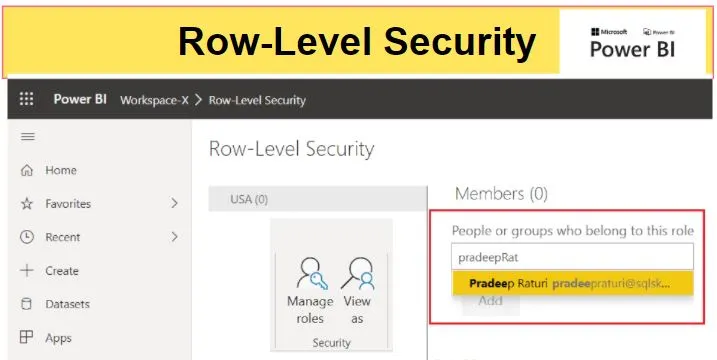
- Row-Level Security (RLS): RLS is a powerful feature that allows organizations to restrict data access at the row level within a dataset. This means that users may have access to the dataset itself but will only see a subset of the data based on their role or group membership. RLS is often used to ensure that employees only view data relevant to their department or region, maintaining data privacy and security.
By utilizing these three levels of role-based security, organizations can create a comprehensive data security strategy in Power BI, ensuring that sensitive information is protected at all times.
Implementing Role-Based Security
Implementing role-based security in Power BI involves several steps, each requiring careful consideration and planning. Here’s a breakdown of the process:
1. Identify User Roles and Permissions
The first step is to identify the different user roles within your organization that will require access to Power BI content. These roles should align with the structure and hierarchy of your business. For example, you may have roles like Executive, Manager, Analyst, or Data Steward. Once the roles are identified, you need to define the specific permissions for each role. Consider what actions each role should be able to perform, such as editing reports, sharing dashboards, or refreshing data. Power BI provides a range of predefined permissions for each role type, making it easier to assign the appropriate access rights.
2. Create and Configure Security Groups
Security groups are a critical component of role-based security in Power BI. These groups allow you to assign multiple users to a specific role, streamlining the management of permissions. You can create security groups in Azure Active Directory (AAD) and then sync them with Power BI to control access. When configuring security groups, consider the following:
- Group Membership: Decide who should be a part of each security group. Users can be added or removed from groups as needed, but it’s important to maintain an up-to-date list of members.
- Group Permissions: Assign the appropriate permissions to each group based on the predefined user roles. Power BI provides a range of options, including viewing, editing, and sharing content, as well as managing data sources and workspaces.
- Group Scoping: Determine the scope of each security group, whether it applies to an entire workspace or specific datasets and dashboards within a workspace.
3. Apply Row-Level Security
RLS is a more advanced feature that allows you to filter data at the row level, ensuring that users only see the information relevant to their role. This step involves defining the rules and criteria for data access within a dataset. When setting up RLS, consider the following:
- Data Sensitivity: Identify which data within your datasets is sensitive and requires restricted access. This could include financial figures, customer details, or employee information.
- User Roles: Define the user roles that should have access to specific data. For example, you may want regional managers to only see data for their respective regions.
- Filter Criteria: Determine the criteria for filtering data at the row level. This could be based on user attributes, such as their region, department, or job title.
4. Test and Validate Security Setup
Once you’ve configured role-based security, it’s crucial to test and validate the setup to ensure it meets your organization’s requirements. This step involves assigning test users to different security groups and roles, then verifying that they can access the intended content and data. Consider the following when testing and validating:
- User Experience: Ensure that users can seamlessly access the content they need without unnecessary restrictions. The user experience should be smooth and intuitive, providing a clear understanding of their permissions.
- Data Visibility: Verify that users can only see the data they are authorized to view. Test different scenarios, such as users with varying levels of access, to ensure RLS and dataset security are functioning correctly.
- Permission Consistency: Check that the assigned permissions are consistent across workspaces and datasets. This includes validating that users with similar roles have comparable access rights.
Best Practices for Data Security and Privacy
Implementing role-based security in Power BI is just one aspect of ensuring data security and privacy. To further enhance the protection of sensitive information, consider the following best practices:
- Regularly Review and Update Permissions: User roles and responsibilities can change over time, so it’s important to regularly review and update permissions. This ensures that only authorized individuals have access to data and helps prevent data breaches.
- Implement Multi-Factor Authentication (MFA): Adding an extra layer of security with MFA can help protect against unauthorized access. This requires users to provide additional verification, such as a code sent to their mobile device, when accessing sensitive data.
- Secure Data at Rest and in Transit: Ensure that data is encrypted both when stored (at rest) and when being transmitted (in transit). Power BI provides data encryption at rest by default, and you can enable encryption for data in transit through the service settings.
- Utilize Data Loss Prevention (DLP) Policies: DLP policies in Power BI allow you to control data export and sharing, helping to prevent unintended data leaks. You can configure these policies to restrict or monitor sensitive data movements.
- Educate Users on Data Security: User behavior plays a significant role in data security. Educate your users about the importance of data privacy, the potential risks, and how to identify and respond to security threats, such as phishing attempts.
Real-World Examples of Role-Based Security in Action
Example 1: Healthcare Organization
A healthcare organization uses Power BI to analyze patient data and create reports for different stakeholders. They implement role-based security to ensure data privacy and compliance with regulations:
- Physicians: Doctors are given access to patient data for their specific department, such as cardiology or oncology. They can view patient records, lab results, and treatment plans but cannot edit the data. RLS is used to filter data based on the physician’s department.
- Nurses: Nurses are provided with access to patient data for their assigned ward. They can view and update patient records, track medication administration, and view relevant reports. Dataset roles control access to specific datasets, such as patient admissions or discharge data.
- Administrators: Hospital administrators have access to financial and operational data, including budgets, occupancy rates, and patient satisfaction scores. They can create and share reports but do not have access to sensitive patient information. Workspace roles govern their access to specific dashboards and datasets.
Example 2: Retail Business
A retail business utilizes Power BI to analyze sales data and create reports for different teams. Role-based security ensures that data is secure and accessible only to authorized users:
- Store Managers: Managers are given access to sales data for their specific store locations. They can view sales figures, inventory levels, and customer analytics but cannot modify the data. RLS restricts data to their respective stores.
- Regional Directors: Regional directors have access to aggregated sales data for all stores within their region. They can compare store performances, analyze regional trends, and view financial summaries. Dataset roles control access to specific datasets, such as sales transactions or customer feedback.
- Marketing Team: The marketing team has access to customer analytics and campaign performance data. They can create reports on customer segmentation, track marketing ROI, and share insights with the wider team. Workspace roles allow them to collaborate and share content within their workspace.
Conclusion and Further Exploration
In this article, we’ve delved into Power BI’s role-based security features, providing a comprehensive guide for organizations looking to secure their data. We’ve explored the different levels of security, from workspace roles to row-level security, and outlined the steps for implementing a robust data security strategy. By utilizing these features effectively, organizations can ensure data privacy and compliance while leveraging the power of business intelligence. Further exploration could include a deep dive into the technical aspects of implementing role-based security in Power BI, including hands-on tutorials and step-by-step guides. Additionally, a follow-up article could focus on user adoption and change management strategies, ensuring that employees understand and embrace the importance of data security within their organization.
How has your organization utilized Power BI’s role-based security features to secure sensitive data? What challenges or successes have you encountered, and what further enhancements would you like to see in Power BI’s data security capabilities?